Comparison of
ETI0001-1237 vs.
ETI0001-1237AA

Standard
ETI0001-1237 Front View

Standard
ETI0001-1237AA Front View

Standard
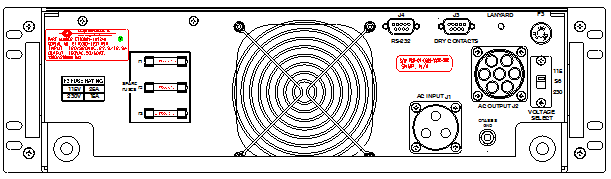
ETI0001-1237 Rear View
Standard
ETI0001-1237AA Rear View

Standard
ETI0001-1237 Side View

Standard
ETI0001-1237AA Side View
The
ETI0001-1237AA will directly replace the
ETI0001-1237 without requiring any changes to the rack, slides or cabling. They are virtually identical except for the added features and benefits of the
ETI0001-1237AA that are listed below.
Features |
Existing |
Proposed |
| Battery Replacement | Requires removal of UPS from rack, removal of (27) screws in top cover, removal of (14) screws holding battery assembly in place, lift battery assembly from unit using attached lifting straps. Reverse process to install new module. Total time 60-90 minutes depending on skill level. | Loosen (7) captive thumb screws on front of unit, pull battery module out front. Reverse process to install new module. Total time less than 5 minutes. Minimal skill required. |
| Battery Backup | Battery module has capacity for 1950 watts output for 15 minutes. | Battery module has capacity for 1800 watts output for 15 minutes or 8 % less. UPS backup time still exceeds initial specification requirements. |
| Air Intake | Aluminum mesh filter on front center of UPS. The mounting of this UPS near the floor has caused this filter to be continuously damaged by operator feet banging into it. | The air intake filter is now behind metal grill work along left front below control panel. The existing potential for physical damage is eliminated. |
| Battleshort Override | Does not exist on this UPS configuration | A standard feature available on this version of UPS. Can be used in emergency situations to insure maximum operational time by overriding thermal shutdown. |
| Elapsed Time Indicator | Does not exist on this UPS configuration | A standard feature available on this version of UPS. Hour meter can be used to track hours of rack operation for scheduling maintenance. |
| Front flange hardware | Two captive screws on each end of front panel to hold the unit in place. Experience has shown the potential for this hardware to become damaged if care is not taken during installation into the rack. Replacement of this hardware requires special tooling. Also hardware float is limited so exact alignment in the rack is important for threads to align. | Four elongated slots on each end of the front panel to hold the unit in place. Standard #10-32 SS hardware is used as fasteners. Lost or damaged hardware is readily available. Slots allow for greater tolerance of unit alignment in rack. |
| Spare Fuses | Spare fuses are mounted to rear of UPS. | Spare fuses are mounted to front and rear of UPS. The front mounted fuses provide more ready access for replacement of the front fuses. |
| Spare Fuse Part Numbers | User must rely on documentation for this information. | Fuse part numbers are silk-screened onto the panel behind each spare fuse holder. When a fuse is removed, this number is visible so the proper replacement can be requested. |